Working with transactions
Purchase orders, inbounds, sales, stock deliveries, damages and similar documents are all transactions. They share the same screen layout and buttons, so this page applies to all of them. Each module's page covers only what's different.
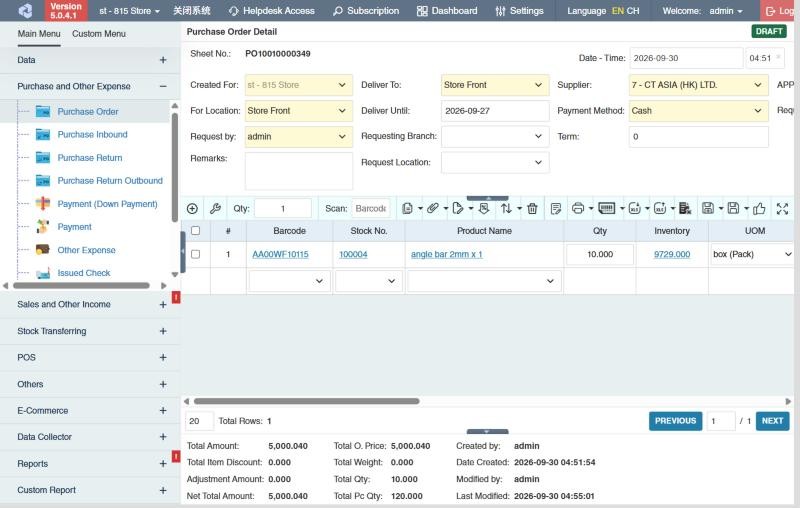
The screen has three parts:
- Header (top): who and what the transaction is for, such as branch, supplier or customer, dates and Remarks. Fields with a yellow background are required. Your company may have added its own fields here too (see User-defined fields).
- Product rows (middle): one row per product, with its toolbar above.
- Summary (bottom): totals (Total Amount, Total Qty and so on) and who created or last modified the transaction.
Statuses
| Status | Meaning | Can you edit it? |
|---|---|---|
| Draft | Saved but not submitted. | Yes |
| For Approval | Submitted, waiting for an approver. | No. Revert it first. |
| Approved | Final. Stock, balances and follow-up transactions are updated. | No. Revert it first. |
| Declined | Rejected by an approver. | No. Revert it first. |
The current status shows as a coloured badge at the top right of the screen.
The transaction toolbar
| Name | What it does |
|---|---|
| Add Product | Opens the product picker to search for and add several products at once. |
| Column Settings | Shows, hides and resizes product columns. |
| Qty / Scan | Scan or type a barcode to add a product. The Qty box sets how many to add per scan. |
| Copy | Copies the products from another transaction. Enter its Sheet Number and choose whether to include its O. Price or Price. |
| Attachments | Attaches files, such as a supplier quotation. |
| Bulk Edit | Changes a value on all selected product rows. |
| Discount / Adjustment | Adds a discount or adjustment to the whole transaction. |
| Sort By | Sorts the product rows. |
| Delete Selected Products | Removes the ticked product rows. |
| Notes | Internal notes about the transaction. |
| Prints the transaction using a printout template. | |
| Barcode Print | Prints barcode stickers for the products on the transaction. |
| Import Excel | Adds products from an Excel file. |
| Export Excel | Downloads the product rows to Excel. |
| Delete Transaction | Deletes a Draft or Declined transaction. |
| Save and Add New ▾ | Save, Approve or Approve and Print, then opens a new blank transaction. |
| Save ▾ | Save, Approve or Approve and Print. |
| For Approval 👍 | Submits a draft for approval. |
| ✔ Approve / ✖ Decline | Approves or rejects a transaction that is For Approval. |
| 💾 Save (on an approved transaction) | Saves the fields you can still change after approval, such as Remarks. |
| ✉ Send E-mail to Supplier / Send E-mail to Customer ▾ | On approved purchase and sales transactions: Compose New Email sends the transaction by e-mail. The list below it shows the e-mails already sent. |
| ⬅ Revert | Returns an approved, declined or for-approval transaction to Draft. |
| Show / Hide Transaction Details | Collapses the header to make more room for product rows. |
Hover over any icon to see its name. You see only the buttons your permissions allow, and some buttons appear only in certain statuses.
How to add products
Use any of these:
- Type in the empty row: click the Product Name (or Barcode) cell in the last row, type part of the name or code, and pick the product.
- Scan: click the Scan box and scan the barcode. Each scan adds the quantity in the Qty box. If your company turned on the finalize window (see the settings below), a Finalize Scan Product window opens first: check the Qty, UOM and price, then click Apply.
- Add Product: search and tick several products, then add them together.
- Copy or Import Excel: bring in the products from another transaction or an Excel file.
Then enter the Qty and check the UOM on each row.
The product lines
Each row is one product. The columns you can show (with Column Settings) depend on the module; the common ones are:
| Column | What it shows |
|---|---|
| Barcode, Stock No., Product Name, Chinese Name | The product. Click the name to open the product. |
| Qty | The quantity, in the row's UOM. |
| UOM / Unit Specs | The unit, and how many default units it holds. Example: 2 BOX with unit specs 24 = 48 pieces of stock. |
| Reference Qty / Remaining Qty / Received Qty | On transactions made from another one: the quantity on the source, what is still open, and what has been received or delivered so far. |
| Inventory / Avail. Inv / UOM Inventory | The product's stock in the transaction's location, the stock not yet promised, and the stock shown in the row's unit. Click it to open the product summary. |
| Cost, Wholesale, Retail, Price A–Price E | The product's current prices, for reference (costs only if you may see them). |
| Highest Price / Lowest Price / Latest Price | This supplier's or customer's price history for the product. |
| O. Price | The original price per unit, before the row's discounts. |
| Discount 1 – Discount 4 | Discounts in %, applied one after the other. |
| Disc/Adj | Extra discounts or charges on the row, typed as a list: Enter one or more price discounts or adjustments, separated by commas. Each value must begin with a + or - sign. Use % for percentage adjustments or omit it for fixed amounts. Examples: -10%, -10%,-100, -200,+5%,-3%. |
| Price | The price per unit after discounts. |
| Price Diff. (%) | How far Price is from O. Price, in %. |
| Amount | Qty × Price. |
| Weight / Total Weight | Weight of the row, from the unit's weight on the product. |
| Bin Location | Where the product is kept. |
| Remarks | A note for this row. |
Example. O. Price 100.00, Discount 1 10 and Discount 2 5 give Price 100 × 0.90 × 0.95 = 85.50. Typing -10%,-5 in Disc/Adj instead takes 10% off the unit price and then 5.00 more: 100 − 10% = 90.00, 90 − 5 = 85.00 per unit. A + value adds a charge the same way.
The totals
Under the rows, the summary shows Total Qty (and Total Pc Qty in default units), Total O. Price, Total Item Discount, Total Weight, Total Amount and, on transactions made from another one, Total Reference Qty and Total Received Qty or Total Delivered Qty. It also shows who created and last changed the transaction, and links to the transactions made from it (for example the purchase inbounds of a purchase order).
With Discount / Adjustment you add discounts or charges to the whole transaction (for example a volume discount or delivery fee): they make up the Adjustment Amount, and the Net Total Amount is Total Amount plus the adjustments.
Other tools on orders
- Scan Mode: By Piece adds one row per scan; By Bulk adds the Qty in the box to the same product's row.
- Clear Undelivered Transactions (on approved orders with Transaction Status Incomplete, for example a purchase order only partly received): closes the quantities that were never received or delivered. CIRMS asks: Clearing undelivered transactions' qty, do you want to generate new transactions where quantities are based on remaining quantities? Answer yes to put the remaining quantities on a new order, no to just close them.
- Print Preview Count: This is the number of times you can still generate a print preview for the current transaction only.
How to save and submit
- Click Save ▾ and choose:
- Save: saves as a Draft.
- Approve or Approve and Print: saves and approves in one step, if you have the approve permission.
- To send a draft to an approver instead, click 👍 For Approval.
After the first save the transaction gets its Sheet No..
When you save, approve or submit, a box confirms it (for example Updated successfully.) with buttons such as Refresh (reload the transaction), Print, Barcode Print, Add New (open a blank transaction) and Close. If your company turned on automatic printing for the module, the printout opens instead.
How to approve or decline
- Open a transaction that is For Approval. In the list, you can filter by Approval Status.
- Click ✔ Approve or ✖ Decline.
To approve or decline many at once, use ⋮ Bulk Action in the list (see Working with lists).
How to correct an approved transaction
- Open it and click ⬅ Revert. It goes back to Draft.
- Make your changes, then save and approve again.
- Reverting undoes the transaction's effect on stock and balances until it's approved again.
- You can't revert a transaction that has already been imported into a later one, for example a purchase order that has been received in Purchase Inbound. Revert or delete the later transaction first. The later transactions are linked at the bottom right of the summary (for example Purchase Inbound: PR10010000552 (Approved)).
- To delete an approved or for-approval transaction, revert it first.
Warnings you may see when saving
- Maximum inventory: a product would go above its maximum stock level. Click OK to continue or Cancel to change the quantity.
- Minimum inventory: on outgoing transactions, a product would drop to or below its minimum quantity (Product already reaches minimum quantity). Click OK to continue or Cancel to change the quantity.
- Price below cost: if your company restricts prices to not go below cost, saving a sales transaction stops with Error at row [1] Price must not go below cost. Raise the price on that row.
- Credit limit: a warning appears on sales transactions when the customer would go over the limit (see Sales Outbound).
Your administrator can turn some of these prompts off in Settings.
Settings that affect all transactions
Your administrator can change these in Settings (see About settings). Click a section to see the choices.
Generic Settings › Barcode Scanning Input Mode
- Allow EAN-13 barcode searching and validation
- Barcode Scan unit is based from
- If scanned product is already existing in the transaction
Generic Settings › Display
- Default number of rows (max of 100)
- Monetary Precision
- Hide Deleted Transactions
- Transaction List: Refresh the list after bulk edits?
Generic Settings › Transaction Setting
- During adding product in Transaction, keyboard will auto focus on … field
- Enable Printing of Transactions Only When Approved
- Allow Editing of Rows in Transactions
- Allow serial number scanning in barcode scan field
- Display popup "Finalize Scan Product" after scanning products? (Desktop View Mode Only)
- Lock all "default" fields of Approved Transactions.
- Lock all "User Defined" fields of Approved Transactions.
- Lock "Attachment" in Approved Transactions
- Product dropdown item limit (max of 50)
- Allow multiple same product in single transaction?
- Disable adding or editing of transactions on or before
- Formula of the Amount will base from:
- Display product inventory count in "Product Autocomplete"?
- Include Negative Discounts in the Total Item Discount calculation
- Delete data collector transaction after successfully import in Web transactions?
- Should the Collection/Payment be automatically transferred to the Approver's branch once the transaction is approved?
- Enable Alternative Unit Price computation
- Allow use of "Custom Unit" during transaction?